
Printed on: July 2, 2025
On iOS 26 we’ve numerous new methods to reimagine our UIs with Liquid Glass. Which means we are able to check out Apple’s built-in functions and discover attention-grabbing functions of Liquid Glass that we are able to use to boost our understanding of how Liquid Glass parts might be constructed, and to grasp what Apple considers to be good observe for Liquid Glass interfaces.
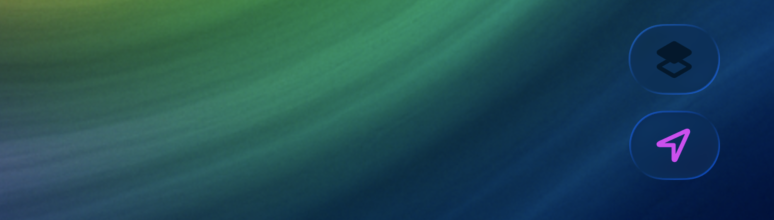
On this put up, we’re going to copy a management that’s a part of the brand new maps app.
It’s a vertical stack of two buttons in a single Liquid Glass container. Right here’s what the part appears to be like like in iOS 26:

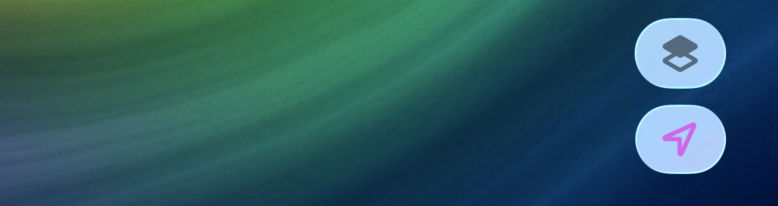
And right here’s the part that we’ll construct on this put up:

We’re going to be making use of buttons, button types, a GlassEffectContainer, and the glassEffectUnion view modifier to attain our impact.
Constructing the part’s buttons
We’ll begin off with a GlassEffectContainer and a VStack that accommodates two buttons:
GlassEffectContainer {
    VStack {
        Button {

        } label: {
            Label("Areas", systemImage: "sq..2.layers.3d.high.crammed")
                .daring()
                .labelStyle(.iconOnly)
                .foregroundStyle(Shade.black.secondary)
        }
        .buttonStyle(.glass)

        Button {

        } label: {
            Label("Navigation", systemImage: "location")
                .daring()
                .labelStyle(.iconOnly)
                .foregroundStyle(Shade.purple)
        }
        .buttonStyle(.glass)
    }
}
This code will merely create two buttons on high of one another utilizing a glass button fashion. The ensuing UI appears to be like like this:
That’s not nice however it’s a begin. We have to apply a unique buttonStyle and tint our glass to have a white background. The code under exhibits how to do this. For brevity, I’ll solely present a single button; the buttonStyle needs to be utilized to each of our buttons although:
GlassEffectContainer {
    VStack {
        // ...

        Button {

        } label: {
            Label("Navigation", systemImage: "location")
                .daring()
                .labelStyle(.iconOnly)
                .foregroundStyle(Shade.purple)
        }
        .buttonStyle(.glassProminent)
    }.tint(.white.opacity(0.8))
}
With this code, each buttons have a outstanding fashion which provides them a background colour as a substitute of being absolutely translucent like they’re with the traditional glass impact:
Now that we’ve our buttons arrange, what we have to do is group them collectively right into a single glass form. To do that, we use the glassEffectUnion view modifier on each parts that we need to group.
Let’s go forward and try this subsequent.
Grouping parts utilizing a glassEffectUnion
A glassEffectUnion can be utilized to have a number of buttons contribute to a single Liquid Glass form. In our case, we would like these two buttons to be handled as a single Liquid Glass form in order that they find yourself wanting much like the Apple Maps parts we’re making an attempt to copy.
First, we have to add a namespace to our container view:
@Namespace var unionNamespaceWe’ll use this namespace as a solution to join our parts.
Subsequent, we have to replace our buttons:
GlassEffectContainer {
    VStack {
        Button {

        } label: {
            Label("Areas", systemImage: "sq..2.layers.3d.high.crammed")
                .daring()
                .labelStyle(.iconOnly)
                .foregroundStyle(Shade.black.secondary)
        }
        .buttonStyle(.glassProminent)
        .glassEffectUnion(id: "mapOptions", namespace: unionNamespace)

        Button {

        } label: {
            Label("Navigation", systemImage: "location")
                .daring()
                .labelStyle(.iconOnly)
                .foregroundStyle(Shade.purple)
        }
        .buttonStyle(.glassProminent)
        .glassEffectUnion(id: "mapOptions", namespace: unionNamespace)
    }.tint(Shade.white.opacity(0.8))
}
By making use of glassEffectUnion(id: "mapOptions", namespace: unionNamespace) to each views they grow to be related. There are just a few situations to make the grouping work although:
- The weather will need to have the identical
idfor them to be grouped - The glass impact that’s used should be the identical for all parts within the union or they gained’t be grouped
-
All parts within the group should be tinted the identical means or they gained’t be grouped
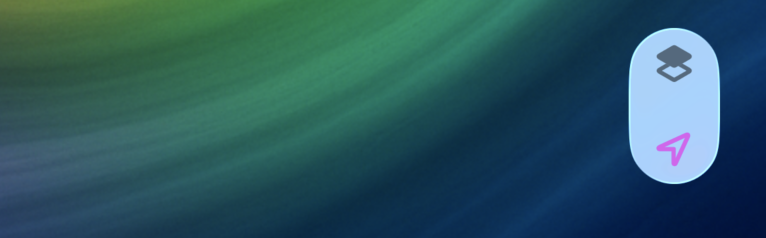
Now that our parts are grouped, they’re virtually precisely the place we would like them to be:
The buttons are a bit near the highest and backside edges so we should always apply some padding to our Label parts. I just like the spacing within the center, so what I’ll do is pad the highest of the primary Label and the underside of the second:
GlassEffectContainer {
    VStack {
        Button {

        } label: {
            Label("Areas", systemImage: "sq..2.layers.3d.high.crammed")
                .daring()
                .labelStyle(.iconOnly)
                .padding(.high, 8)
                .foregroundStyle(Shade.black.secondary)
        }
        .buttonStyle(.glassProminent)
        .glassEffectUnion(id: "mapOptions", namespace: unionNamespace)

        Button {

        } label: {
            Label("Navigation", systemImage: "location")
                .daring()
                .labelStyle(.iconOnly)
                .padding(.backside, 8)
                .foregroundStyle(Shade.purple)
        }
        .buttonStyle(.glassProminent)
        .glassEffectUnion(id: "mapOptions", namespace: unionNamespace)
    }.tint(Shade.white.opacity(0.8))
}
This completes our impact:
In Abstract
On iOS 26, we’ve infinite new potentialities to construct attention-grabbing UI parts with Liquid Glass. On this put up, we tried copying a UI ingredient from Apple’s Maps software to see how we are able to construct a single Liquid Glass ingredient that teams two vertically stacked buttons collectively.
We used a glassEffectUnion to hyperlink collectively two UI Elements and make them seem as a single Liquid Glass form.
You discovered that this view modifier will group any Liquid Glass parts that share the identical glass fashion right into a single form. This implies these parts they’ll feel and appear like a single unit.