
The SpeedyBee Mario 5 FPV Drone is lastly right here, providing an inexpensive choice for individuals who need a succesful FPV drone with out the effort of constructing from scratch. Based mostly on SpeedyBee’s lately launched Mario 5 body, this drone requires solely a receiver to be flight-ready. Right here’s my in-depth have a look at the Mario 5, from unboxing to flight efficiency, and my last verdict on whether or not it’s price including to your FPV fleet.

The place to Purchase
You should purchase the Mario 5 FPV Drone from:
Completely different Choices
The SpeedyBee Mario 5 sequence contains two variations: one with out an FPV system and one other with the DJI O3 Air Unit. Each fashions share the identical flight controller, ESC, and body.
The Mario 5 can be obtainable in two body configurations:
- X Body: Provides extra exact dealing with, ultimate for freestyle flying. Nonetheless, when utilizing the DJI O3, you would possibly see the propellers in view, which may very well be distracting for cinematic pictures.
- Deadcat Body: Retains the propellers out of view when utilizing an motion digicam or the DJI O3, excellent for cinematic footage. If capturing clean video is your precedence, I’d advocate the deadcat body.
I’m reviewing the deadcat model outfitted with the DJI O3 and GPS.
Notice: The SpeedyBee Mario 5 doesn’t include a receiver. You’ll want so as to add one, corresponding to an ExpressLRS receiver: https://oscarliang.com/setup-expresslrs-2-4ghz/#Receivers
Unboxing

Right here’s what comes within the field:
- HQ J40 Props: A set of 4 5.1x4x3 propellers.
- Battery Straps: Two SpeedyBee rubberized straps.
- {Hardware}: Screws, prop mounts, spare facet plates and a receiver cable.
Specs
- Body: Mario 5
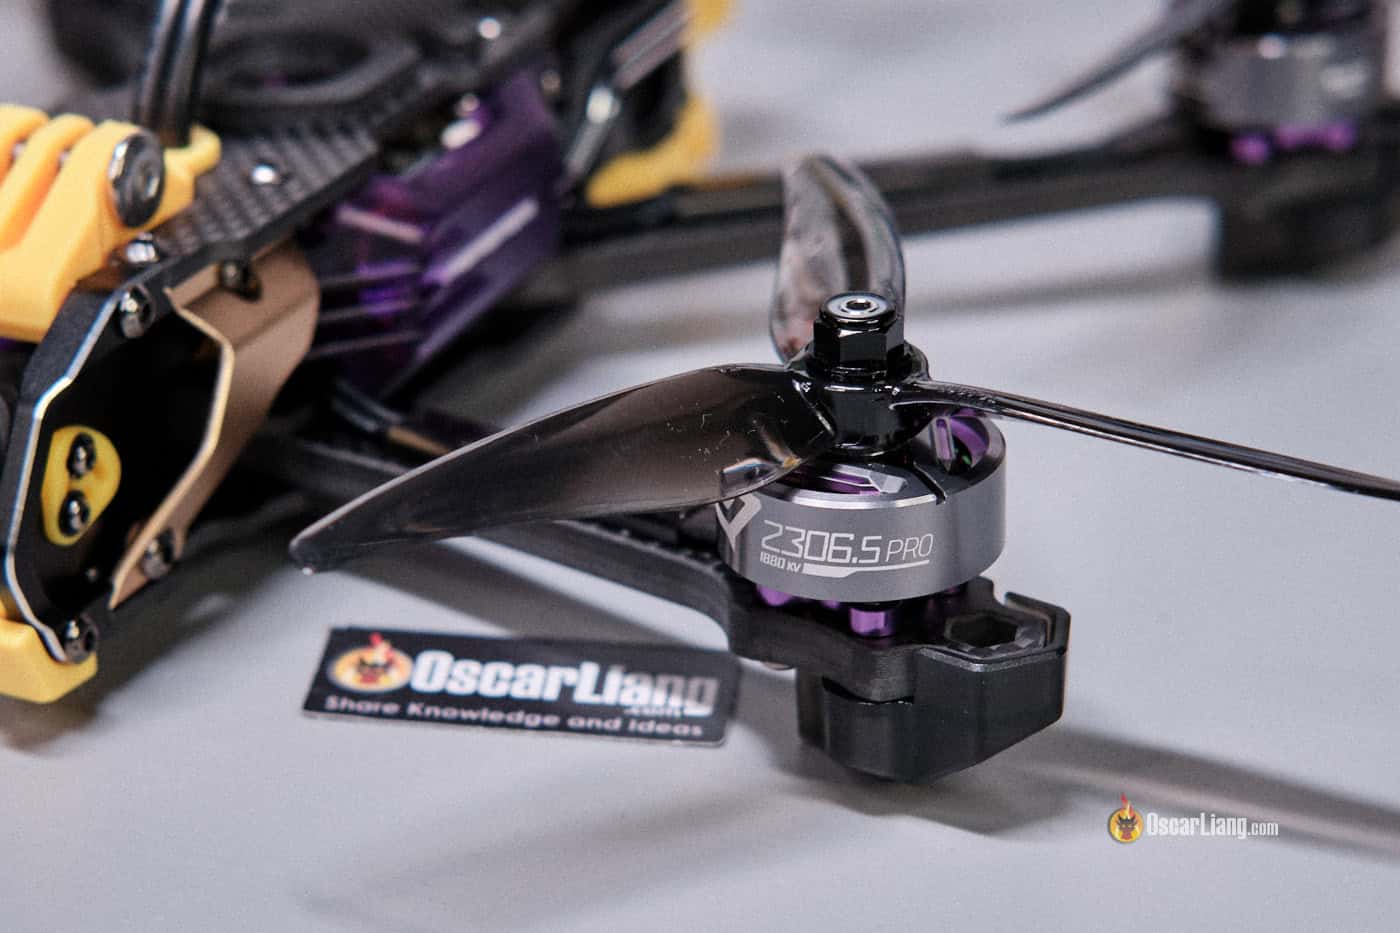
- Motors: SpeedyBee Storm 2306.5 1880KV
- Flight Controller: SpeedyBee F405 V4
- ESC: SpeedyBee 55A 4-in-1 BLS ESC (flashed with Bluejay)
- FPV System (Optionally available): DJI O3 Air Unit
- Propellers: HQ J40 5.1x4x3
- LEDs: Aspect panels with built-in LED Strip
- Beneficial Battery: 6S 1000–1800mAh
- Prime Pace: Marketed max velocity 190 km/h
- Flight Time: 5 to 10 minutes, relying on flight type and battery dimension
- Weight (with DJI O3):
- With out battery: 497g
- With 6S 1100mAh: 697g
- With 6S 1100mAh and GoPro 11: 1051g
Design
Taking the Mario 5 out of the field, my first thought was, “This factor is constructed like a bit of artwork!” It options clear facet panels with built-in LED strip, including a flashy but useful aesthetic. For these seeking to optimize weight, these panels will be eliminated to barely improve flight efficiency, which I’ll do later on this assessment.

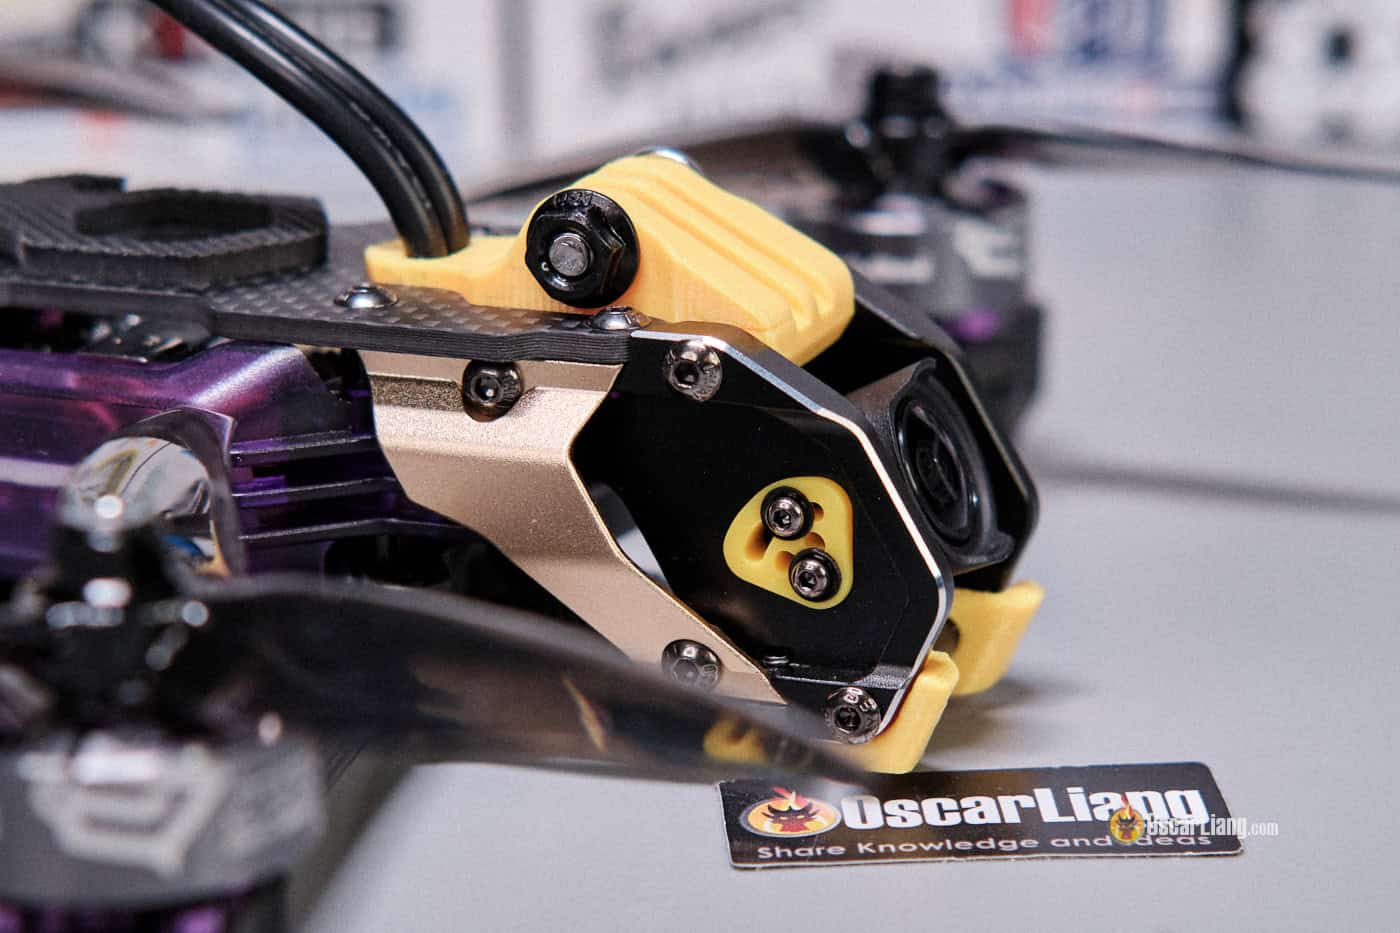
The body is constructed with 6mm arms and a couple of.5mm carbon fiber prime/backside plates, strengthened with a CNC aluminum digicam cage within the entrance for added sturdiness. The construct high quality is spectacular, with SpeedyBee’s consideration to element evident in neatly routed wiring, sturdy motor mounts, and safe fastening.
The body is appropriate with analog, Walksnail, and DJI O3 air items, giving pilots flexibility in FPV setup choices.

Having reviewed the Mario 5 body earlier than, I can say it’s well-engineered however advanced, with some heavy ornamental parts that will not be important for each pilot. It’s a sturdy 5-inch drone weighing 497g with out the battery—positively crash-resilient, although a bit on the heavy facet for a 5-inch FPV drone. For comparability, the Orqa DreamX, which I reviewed lately, weighs simply 340 grams. However that’s an analog quad, with the O3 Air Unit factored in, the Mario 5 is roughly 130g heavier. It’s A LOT.
One pleasant characteristic is the Mario startup sound. Upon plugging within the battery, the Mario 5 performs the enduring Mario theme tune, including persona to every flight. It’s a small contact, but it surely provides to the enjoyable issue.
The drone’s design contains mounting area for a GPS module, which I might positively advocate for enabling GPS Rescue mode. This can be a helpful characteristic should you plan to fly long-range or in unfamiliar areas, as it should permit the drone to return house if it loses sign.

The XT60 pigtail comes out in the midst of the highest plate, the placement is useful and handy, although it will possibly get in the way in which and restrict digicam tilt should you’re utilizing a GoPro. For extra flexibility in digicam angles, relocating the XT60 to the again is likely to be preferable.

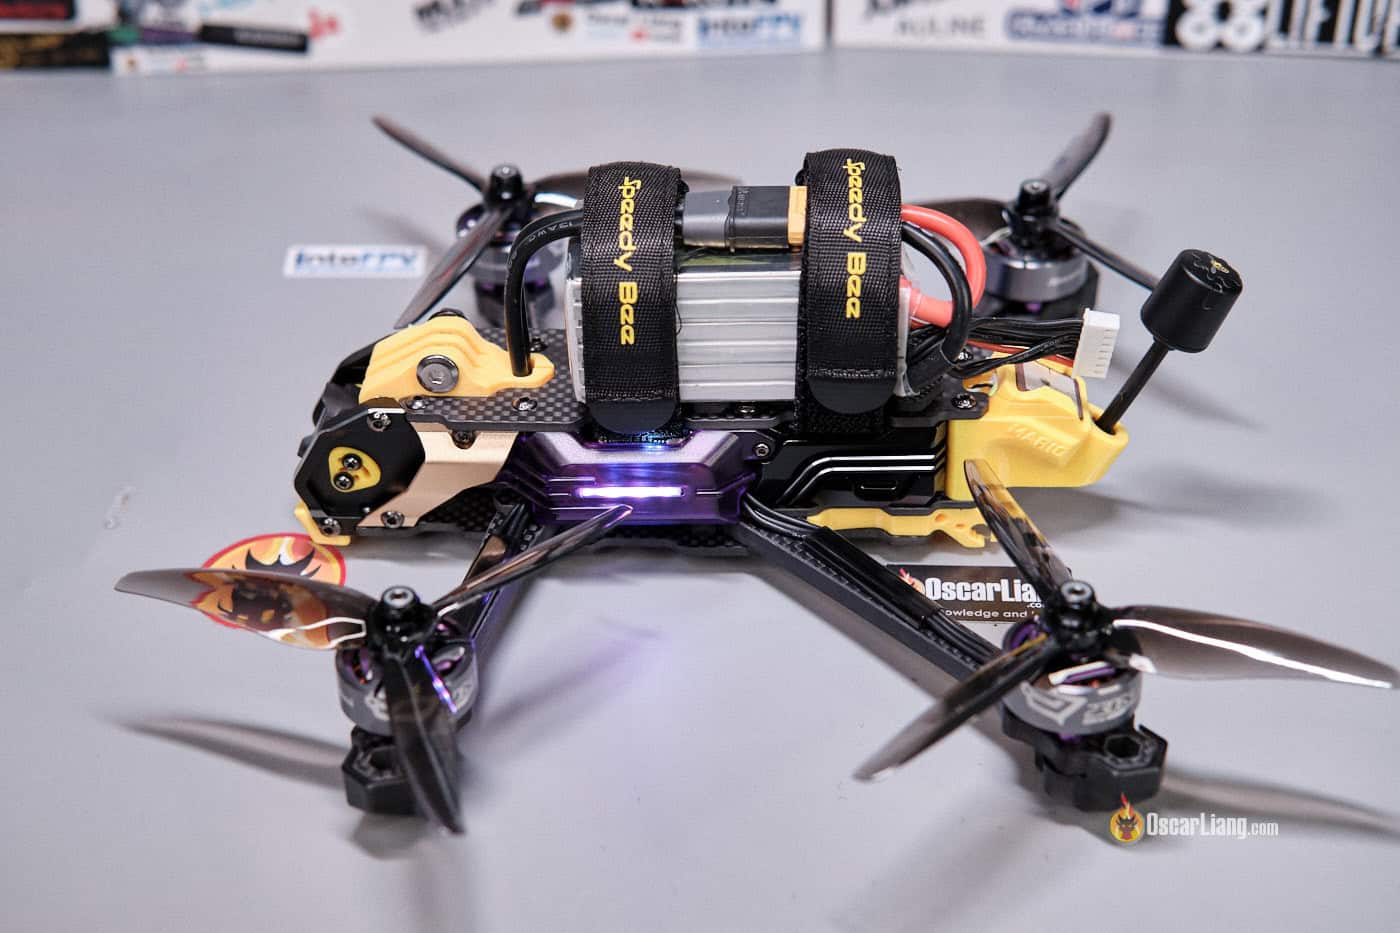
Lastly, the O3 Air Unit is surrounded by aluminium facet panels that act as heatsink. Fortunately, you continue to have easy accessibility to the USB-C port and SD card slot, downloading O3 footage is handy. However the place I dwell, it’s chilly sufficient that overheating hasn’t been a difficulty, so I plan to take away the heatsink to save lots of weight.

Construct High quality
Taking the Mario 5 aside, I used to be instantly impressed by SpeedyBee’s consideration to element. The cables are trimmed to the right size, and the soldering is clear {and professional}. This meticulous meeting not solely enhances sturdiness but additionally minimizes potential points over time—one thing SpeedyBee has clearly prioritized on this design.
I additionally recognize that all {hardware} is SpeedyBee-branded—the body, flight controller, ESC, and motors are all from the identical model, making a cohesive construct the place every element is absolutely appropriate with the others.

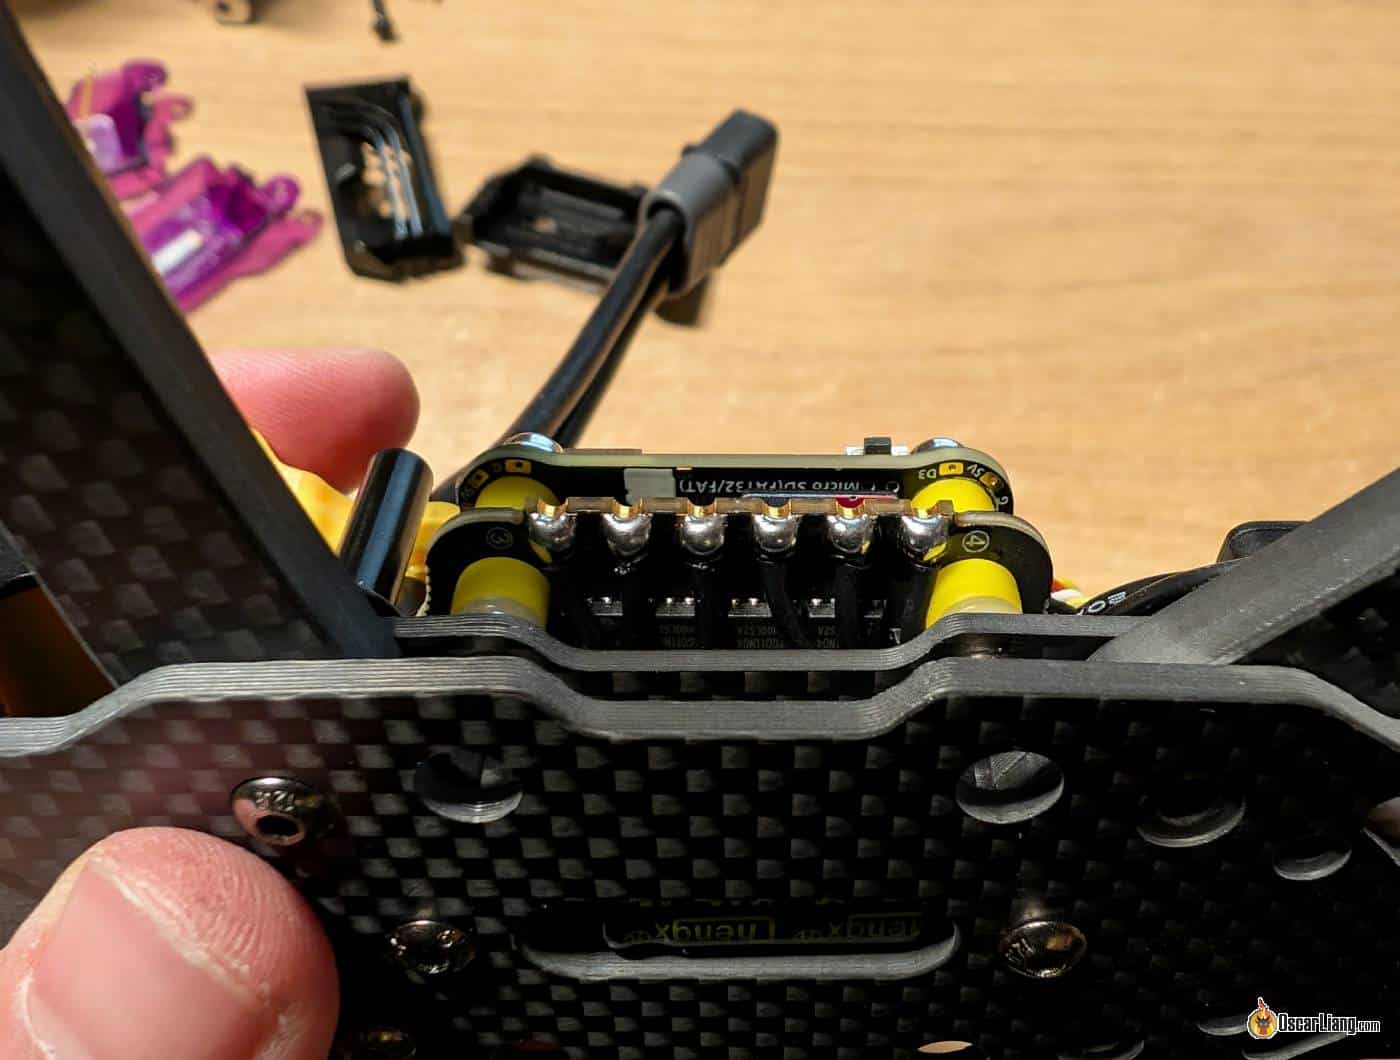
Lastly, one main inconvenience, is that the facet panel blocks the USB port on the flight controller. You must unscrew one screw first to open the facet panel.


Then you’ll notice it doesn’t open fairly extensive sufficient to insert the USB cable, which is embarrassing.

I needed to take away the aluminium “fin” subsequent to the digicam so as to open the facet panel extra. Alternatively, you could possibly additionally use the SpeedyBee app in your telephone, and configure the drone wirelessly by means of Bluetooth.

The facet plate additionally covers the SD card slot on the flight controller, which may very well be inconvenient should you plan to make use of Blackbox. You’ll must take away the facet plate to entry it, and I’ll stroll you thru this course of later within the assessment.
Including Your Personal Receiver
Apparently, the Mario 5 doesn’t include a receiver, so technically it’s not a real BNF (bind and fly) drone; as an alternative, it’s a PNP (plug and play) mannequin. Whereas this might sound uncommon and inconvenient, it does provide flexibility in choosing your most popular receiver kind.
Fortunately, putting in the receiver is fairly straightforward if you’re utilizing an ELRS receiver. The drone features a receiver cable that you could solder to your receiver after which plug straight into the drone. It’s an easy course of, and also you received’t must fully disassemble the drone to put in it, which is a pleasant contact for anybody seeking to get airborne shortly.


Flight efficiency
Proper from takeoff, it was clear this drone packs severe energy. Though the Mario 5 is on the heavy facet, and the motors are the comparatively smaller 2306.5 (most 5″ drones today use 2207 motors), it nonetheless delivers an exhilarating quantity of thrust. It’s quick, highly effective, and responsive—the whole lot you need in an FPV drone.
The Mario 5 simply hits speeds of as much as 150 km/h and cruises comfortably round 100 km/h. This makes it greater than succesful for high-speed chases.
Whereas the inventory tune has room for enchancment, it supplies a clean flight expertise. The controls really feel barely “mushy” because of the conservative tune, however I believe it fits nicely to newbies and pilots targeted on relaxed, cinematic footage. For extra aggressive flyers, some tuning could make the Mario 5 much more responsive.
Right here’s the gyro noise graph of the inventory tune.

When it comes to flight time, I obtained round 5:30 to six:30 utilizing a 6S 1100mAh LiPo battery, relying on flying type. It hovers at round 21% throttle with a completely charged battery—not as quick as another BNF quads with lighter construct and bigger motors, but it surely nonetheless gives loads of energy and feels extra manageable when navigating by means of tight areas.
The GPS performs nicely, getting 17 satellites after a few minutes. Nonetheless, rescue mode isn’t configured, so that you’ll must set it up your self. I’ve a information right here for anybody who wants assist with that: https://oscarliang.com/setup-gps-rescue-mode-betaflight/
The present sensor is fairly correct out of the field, though I wanted to barely improve the size by 3 factors for optimum readings.
With additional PID and filter tuning, this drone’s efficiency will be elevated considerably. I spent 2 hours on a customized tune for this quad, which I’ve shared on my Patreon. By optimizing the filters and PID settings, I managed to make the Mario 5 much more exact and responsive, giving it a extra linked, snappy really feel that’s excellent for freestyle flying.
Take a look at a few of my flight footage to see the distinction:
Inventory Tune:
Customized PID/Filter Tune:
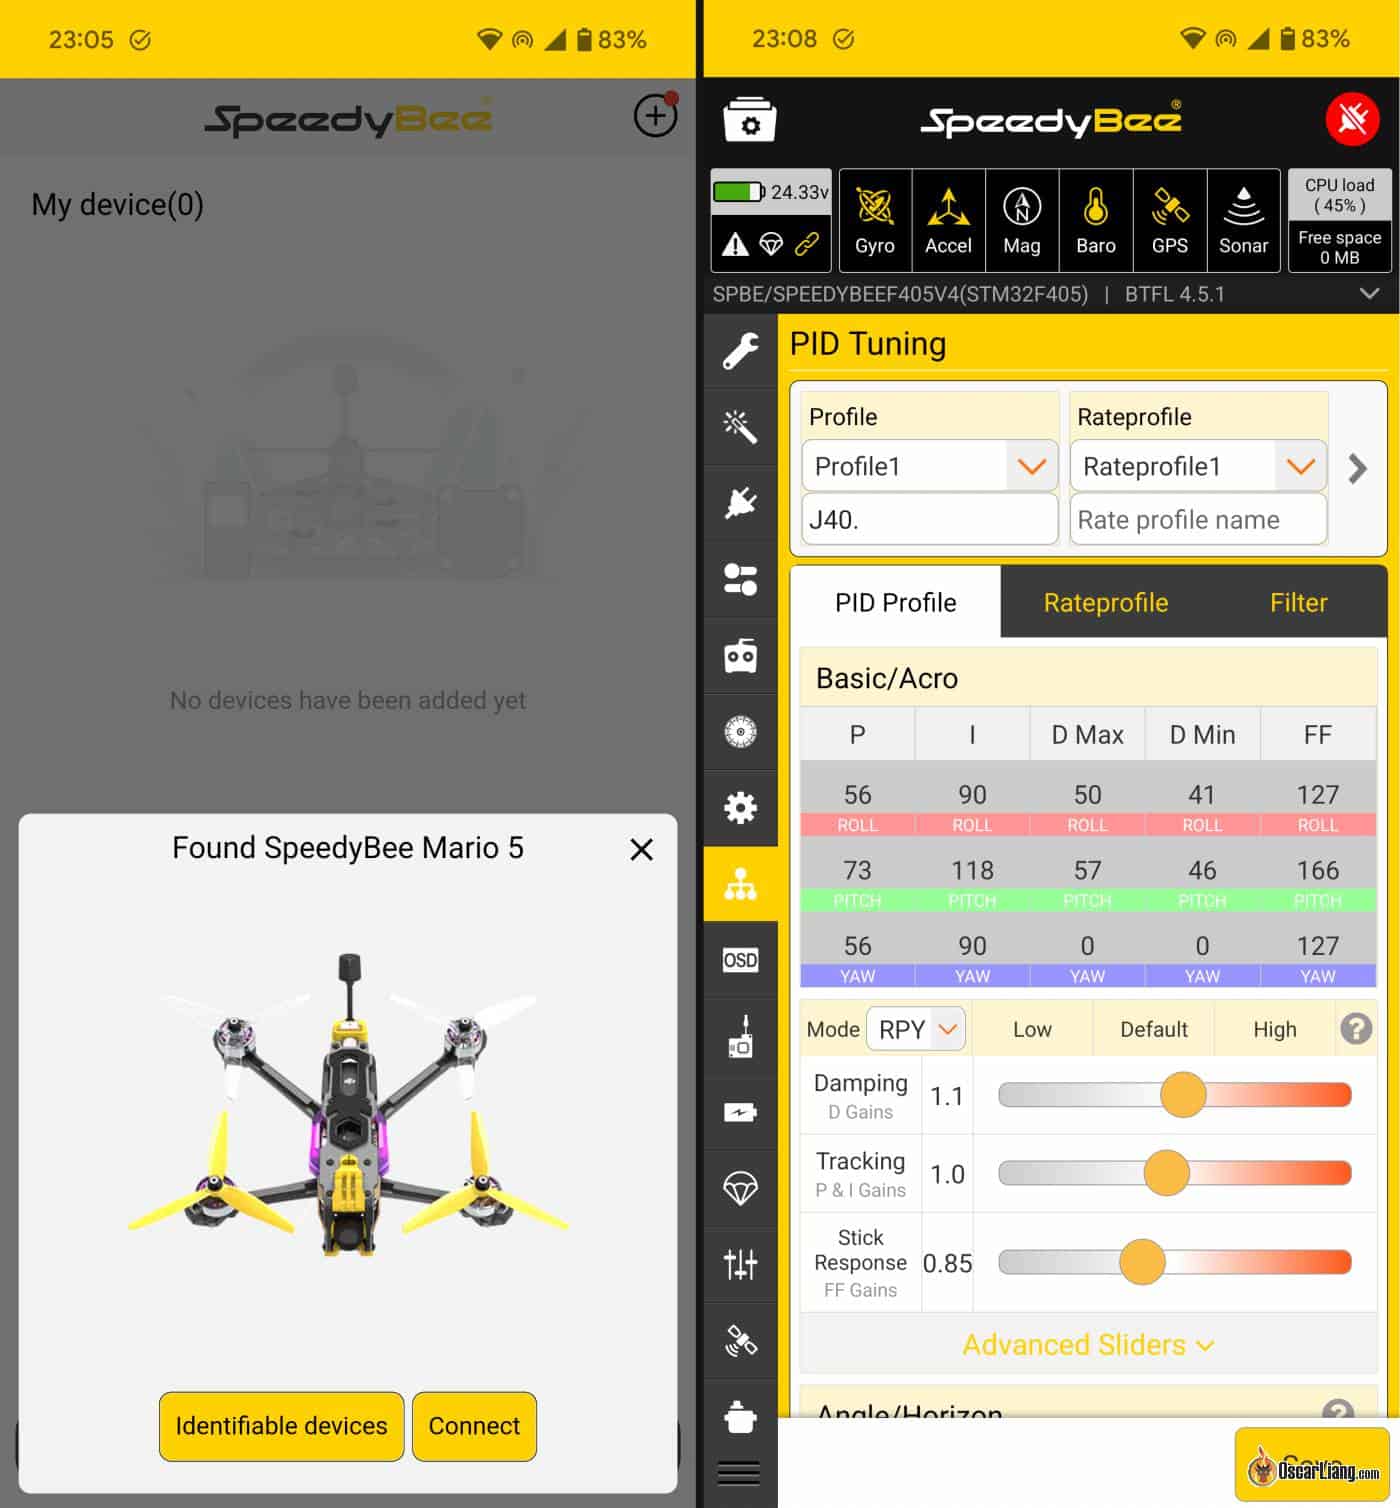
The right way to Setup
Default CLI dump (CLI diff) will be discovered right here.
Organising the SpeedyBee Mario 5 FPV Drone for its first flight is simple:
- Set up and Bind Receiver: Solder your ELRS receiver (I’m utilizing the BetaFPV Nano 2400 RX) and full the binding course of.
- Bind DJI O3: The DJI O3 unit comes pre-activated, so it’s ready to bind out of the field.
- Modes: Configure switches for arming and mode modifications, corresponding to angle mode.
- OSD: Apply my OSD template: https://oscarliang.com/betaflight-osd/#HD-with-GPS
- That’s it!
The ESCs come pre-flashed with Bluejay firmware (J-H-40 Bluejay 0.19 48kHz), so no further configuration is required.
To vary settings in Betaflight, you would possibly need to take away the facet plates first. Alternatively, the SpeedyBee app in your telephone permits you to configure settings remotely through Bluetooth or WiFi—ultimate for fast discipline changes.
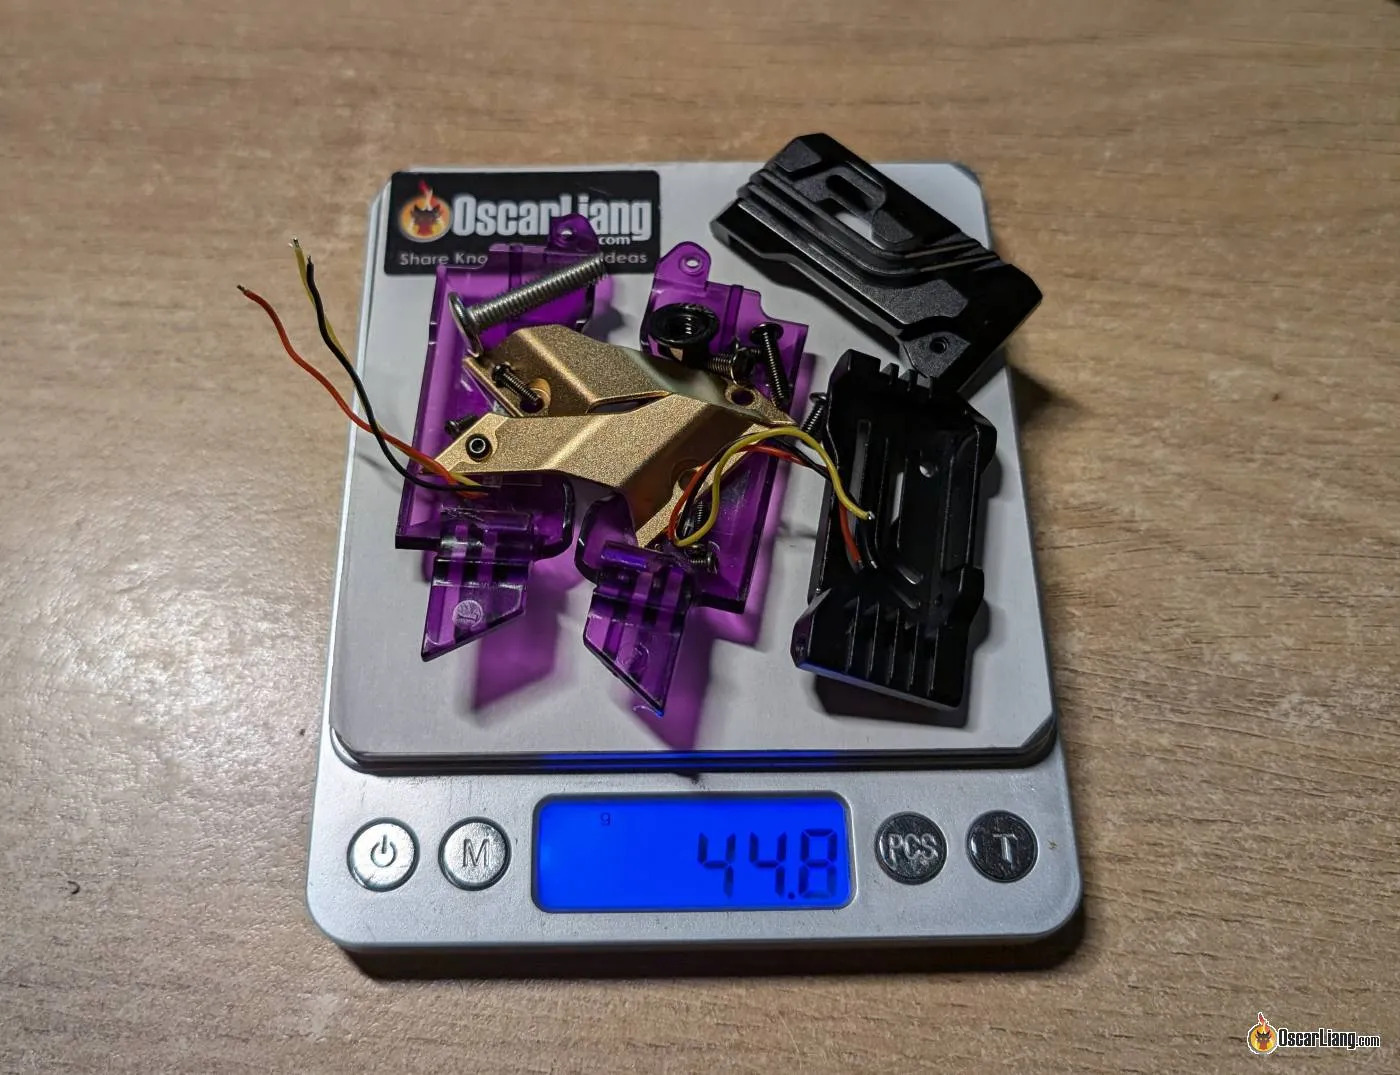
For weight discount, I eliminated non-essential elements just like the facet panels and O3 heatsink. These are principally for aesthetics and don’t contribute to flight efficiency, actually they make it worse as they’re simply useless weight. 45g of weight saving is very large on a 5″ quad!
When changing the O3 heatsink with standoffs, I observed the body peak is definitely 23mm which requires 23mm standoffs, an unusual size. I’ve each 22 and 24mm standoffs, simply no 23mm. Ultimately I simply used 22mm standoffs with a 1mm spacer as an alternative.


A Few Drawbacks
Whereas the Mario 5 has so much going for it, there are just a few areas it will possibly enhance on:
- Restricted USB Entry: Accessing the USB port on the flight controller requires partial disassembly. Though the SpeedyBee app covers most configuration wants, simpler USB entry could be useful.
- No Pre-installed Receiver: An included ExpressLRS receiver would make it a real BNF, sparing pilots from further soldering and meeting.
- Weight: At 497g, it’s on the heavier facet for a 5-inch quad. Eradicating the facet plates and metallic elements can cut back weight by as much as 45g, making it extra agile and environment friendly.
- PID and Filter Tuning: The inventory tune leaves room for optimization. SpeedyBee has taken a conservative method right here, which supplies a protected margin for error and minimizes potential points like motor overheating, however superior pilots could desire a extra aggressive setup.
- No Buzzer: It has flashy LEDs, however no buzzer?! Please can we get our precedence straight? 🙂

Remaining Verdict: Is the SpeedyBee Mario 5 for You?
The SpeedyBee Mario 5 is a wonderful alternative for anybody seeking to dive into FPV or improve to a strong 5inch 6S platform with out the effort of constructing from scratch. The Mario 5 combines high-quality elements, considerate design, and clean flight efficiency in a single package deal, making it a incredible choice for pilots who need a virtually ready-to-fly expertise.
You should purchase the Mario 5 FPV Drone from:
Whereas the setup course of requires including a receiver, and the body design has some inconveniences, these aren’t deal breakers. With a little bit of modifications, tuning and persistence, these limitations will be overcome.
General, SpeedyBee has delivered a stable, well-built quad within the Mario 5 FPV drone, providing the efficiency FPV pilots want. Should you’re after a strong, dependable quad that saves you from constructing it your self, the Mario 5 is a superb decide.
For many who need to optimize freestyle efficiency, try my customized tune obtainable on my Patreon. Benefit from the flight!